
Woodturning Dust Control That Actually Works (My Workshop Setup)
- David Condon

- Apr 17
- 9 min read
Updated: Apr 18
Dust control is one of those things that gets talked about a lot, but in reality, many workshops are only doing half the job.
When I first started out, I underestimated just how much fine dust woodturning creates, especially during sanding. It doesn’t take long before it’s everywhere, on machines, on surfaces, and in the air you’re breathing.

Over time, I’ve built a system that actually works in a real workshop environment, not just in theory. It’s not perfect, but it’s practical, and more importantly, it’s something I use every day.
If you’re new to woodturning, I’ve already covered the health and hazard side of things in more detail here:👉 Is Wood Dust Dangerous? What Every Beginner Should Know
This post is about the next step, how to actually deal with it.
At-Source Dust Control (Where It Really Matters)
The most effective way to deal with wood dust is to capture it at the point where it’s created.
In my workshop, I use several drum-style extractors, they are located at machines where I can't pipe extract from. They are mainly from Record Power, along with a couple of SIP units. In practical terms, I don’t see any real difference between them, both do exactly what they’re supposed to do.
These extractors are excellent for handling heavy dust and chip removal at source, especially during sanding or when working at the lathe. Because they use fine micron filters, they’re suitable for most small to medium workshops and do a very good job of capturing the bulk of airborne material before it spreads.
At the very least, you should have one of these in your workshop.
Where They Work Best
● Drum sanders, ideal for large volumes of fine dust & chips
● Lathes, especially during sanding
● Bandsaws, helps keep wheels clean and blades running true
● Table Saws, as they throw out lots of fine dry dust

Using one for a bandsaw is often overlooked, but it makes a difference over time.
Drawbacks (From Real Use)
No system is perfect.
● They are noisy if running inside the workshop
● Not very portable unless you add a wheelbase
● Paper filter bags can get damp, which reduces effectiveness
For the portability issue, I got around it by placing them on one of those round furniture movers which I bought in Lidl. You have to figure out how to clip it in place but that is not difficult. Once clipped in place, they’re much easier to reposition. Once they have an amount of extracted material inside they are no longer top-heavy.
Keep the replacement paper bag filters in your home, this keeps them dry and ready to use.
My Experiment
At one stage, I also experimented with adding a plastic bin on top of the drum extractor to reduce the noise, an 80 or 90 litre one from what I remember. I cut a slot in it so it would fit over the extractor pipe.
The bin was already cracked, so no loss to the house.
It worked reasonably well, with enough air intake to keep things flowing, but it added bulk and complication to its operation.
I even had to use a wooden spoon through a hole in the top to switch it on and off. I was properly McGyvering it at that stage, don’t laugh.
In the end, it wasn’t something I stuck with. Once I got my pipe system set up, I removed the bin and put the extractor back to proper use on another machine.
Central Extraction System (My 2HP Setup)
As the workshop grew, I needed something that could handle multiple machines without constantly moving extractors around.

I now run a ducted system into a 2HP Holzmann extractor, which services my three main lathes.
Setting this up isn’t overly complicated, but it does need a bit of planning and you will need help when taking measurements and to hold the pipe when adding your Y connections.
What Matters Most
● Pipe layout, airflow needs to be as direct as possible
● Y connections, these should be positioned to encourage smooth airflow
● Blast gates, these are essential
Blast gates allow me to close off unused lines so all the suction power goes to the lathe I’m working on.
Without them, the system loses efficiency very quickly.
Note: The original collection bag was torn during a move, so I replaced it with a different brand, as it was all I could source at the time. The diameter is correct, but the bags are shorter.
That means they don’t support the weight of the waste as well, so I’ll be adding a box underneath to take the load.

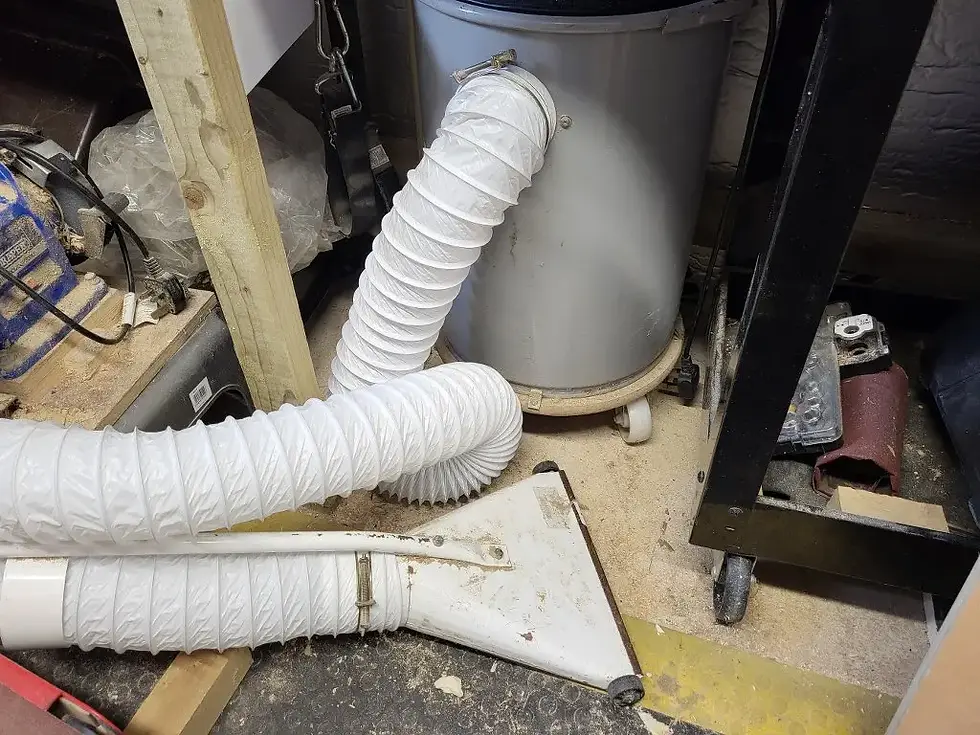
The image above is my at source extraction hood for one of my 3 main lathes. The drum extractors operate in a similar fashion but are located right next to or close to you.
Real-World Performance
This setup works well, especially during heavier sanding like bowl work.
But it’s important to be realistic. It doesn’t catch everything.
Fine airborne dust will always escape, no matter how good your extraction is. That’s where the next part of the system comes in.
Background Air Filtration (What Most People Miss)
Even a good extraction system won’t deal with the finest dust particles floating in the air.
That’s why I run two overhead Jet AFS-500 air filtration units.

I mounted them using 6-inch timber spanning the width of the internal trusses, secured in place with old ratchet straps, screwed in place using 2 inch washers. It’s a narrow space in the metal shed ceiling, so I had to make use of what I had.
I also added rubber air conditioning unit foot dampers under the timber, which help reduce vibration during operation. They’re not the easiest thing to get here, my uncle brought them over from the US for me.
One filter runs continuously in the background, and I switch on the second when I’m doing heavier sanding work, especially with larger mandrels like 6 inch (150mm).
This isn’t about instant results.
It’s about gradually cleaning the air in the workshop and reducing the amount of fine dust that settles on surfaces or stays suspended.
Without this step, you’re only solving part of the problem.
Making Extractors Easier to Move and Position
To make the drum extractors easier to move around, I mounted them on simple wheel bases. They’re not the most portable machines by design, so this makes a big difference when repositioning them between lathes and other equipment.
I also switched to using Xpelair-style ducting on one of them, as the standard extractor hose was too rigid and awkward to work with in tighter spaces. The more flexible ducting makes it much easier to position the intake where it’s needed.
The only downside is that it’s not as tough as proper extractor hose, so you need to be mindful of what you’re picking up. As long as you’re not hoovering sharp offcuts or anything heavy, it works well in practice.
😷 Personal Protection (Non-Negotiable)
No matter how good your extraction and filtration setup is, it doesn’t replace personal protection.
I use a 3M Versaflo powered respirator when sanding, especially with hardwoods.
This is something I consider essential as a professional woodturner.
Fine wood dust isn’t just a nuisance, it’s a genuine health risk. Long-term exposure can lead to respiratory problems and more serious issues.
If you haven’t already read it already, I go into more detail here:👉 From Dust to Disaster: Common Workshop Hazards and How to Prevent Them
If you take one thing from this post, it should be this:
Extraction helps, filtration helps, but your lungs still need protection.
⚠️ What Doesn’t Work (Or Falls Short)
Before I settled on my current setup, I tried a few cheaper and simpler options to see if I could get away without a proper extraction system.
One of my early attempts involved using 2-inch waste pipe with Y connections and flexible washing machine hose connected to each machine and run through an old Dyson hoover.
On paper, it seemed like it might work.
In reality, it failed almost immediately.
The ridges in the flexible hose created a harmonic effect as the air rushed through it, producing a high-pitched noise well over 100 decibels. It was unbearable to use for any length of time, and that experiment didn’t last long.
It was a good lesson, though.
Just because something can move air doesn’t mean it’s suitable for dust extraction in a workshop.
From experience, here are some of the most common mistakes:
● Relying on a basic shop vac as a full solution
● Using incorrect pipe sizes, which reduces airflow and overall efficiency
● Poor ducting layout, where bends and junctions restrict airflow
● Assuming one machine will handle everything
● Letting filters clog or get damp
● Thinking visible dust is the only problem
The biggest issue is underestimating fine dust.
Just because you can’t see it doesn’t mean it’s not there. Turn off the lights and shine a torch across your workshop, you’ll immediately see the fine dust that’s normally invisible during the day.
🧠 How It All Works Together
The only way I’ve found to properly manage dust is to treat it as a system, not a single solution.
● At-source extraction handles the bulk
● Central extraction supports multiple machines
● Air filtration cleans the background air
● Personal protection covers what everything else misses
Each part plays a role.
Remove one, and the whole system becomes less effective.
Final Thoughts
You don’t need to build a perfect setup overnight.
Even small improvements can make a big difference.
But ignoring dust control completely isn’t something I’d recommend to anyone, especially if you plan to spend a lot of time in the workshop.
This is one of those areas where a bit of effort upfront pays off long term, not just in cleaner machines and a tidier workspace, but in your own health as well.
If you’re looking to build out your setup further, you’ll find more practical guides like this on my Woodturning Guides & Articles page.
Thanks for Reading,
David
──────────── ✿ ────────────
If you’d like to support what I do here, there’s a small “buy me a coffee” option below.
──────────── ✿ ────────────
☕ Buy Me a Coffee?
I used to run ads on my website to generate a small income, but they slowed things down and didn’t fit the feel of what I’m building here. So, I’ve removed them in favor of something simpler and more personal—a “Buy Me a Coffee” button.
If you found this post interesting, helpful, or simply enjoyable, feel free to use the link below to show your support. No pressure at all—but every little bit helps, and it’s always genuinely appreciated. As a small independent maker, I rely on a mix of teaching, crafting, and sharing to keep things going. This is just one way to help keep the shavings flying. Thanks so much!
About the Author
I’m David Condon, a woodturner and small business owner based in Tralee, Co. Kerry. I’ve been working with wood for most of my life at this stage — 11 years as a carpenter and over a decade running my own woodturning business.
Over the years, I’ve learned that woodturning is as much about patience and problem-solving as it is about tools and technique. I work mainly with Irish hardwoods, teach woodturning full-time, and spend most days learning something new in the workshop myself. On this site, I share the same practical knowledge I pass on to my students, shaped by experience, mistakes, and time spent at the lathe. If you’re interested in learning in person, I offer woodturning lessons in Tralee, with details available on my Woodturning Tuition page.
© David Condon Woodcraft – All Rights Reserved.
More Woodturning Pages to Explore
● Hampshire Sheen - Fine Finishing products that will highlight your project pieces
● Hamlet Tools - Fantastic Woodturning Tools from a well trusted brand
● Woodcraft Hub - View my woodcraft creations for inspiration of gift buying.
● Sanding Essentials - Essential sanding products for Woodturners & Woodworkers.
● Woodturning Blanks - A fine range of Hardwood Spindle Blanks & a few Bowl Blanks too!
● Woodturning Pen Blanks - A huge assortment of Acrylic & Irish Hardwood Pen Blanks.
● Crafter's Haven – A vast range of craft supplies for crafters and gift givers!
Original content © David Condon Woodcraft — Written by David Condon. Please credit and link if shared.

Comments