
My Pen Making Process: Drilling, Tube Preparation and Gluing

When I first started making pens back in 2025, I didn’t simply accept one method and stick with it. I experimented with different ways of selecting and preparing the timber, drilling the blanks, preparing the brass tubes and, especially, gluing them securely into place.
There is plenty of advice available on pen making, but different methods suit different people, workshops and ways of working. What follows is the process I have gradually settled on after making a number of pens, trying different approaches and, importantly, running into a few problems along the way.
This is not intended as the only way to make a pen. It is simply the method that is currently giving me the most confidence from the point where I select the timber through to having the brass tube glued securely into the blank and ready for barrel trimming and turning.
Along the way, I’ll also explain why I changed some of my original methods, what went wrong, and the small adjustments that have made the process more reliable for me.
Why Did I Start Making Pens?
I have to say that I was very reluctant to start making pens. As a general woodturner, I had been making everything from small pieces to large bowls for years, but pen making just didn’t seem to interest me.
Over time, though, I realised that adding more products expanded my range and gave buyers more choice. I also had a large amount of smaller pieces of good wood that could easily be turned into pens rather than used for other small products that might not sell as well.
I eventually purchased a quantity of good-quality pen kits and then did absolutely nothing with them for more than a year and a half.
When I finally started, I spent quite a bit of time experimenting with production methods and finishes until I found a process that worked reliably and could be scaled up, at least to a certain point. That meant looking not only at how the pens were turned and finished, but also at how the timber itself was selected and prepared.
I have to say, I was quite nervous about making pens at first, as most of my normal woodturning work doesn’t involve working to such close tolerances. I actually specialise in freeform work based where pieces are made similar but different from each other.
If you find yourself in the same boat, my advice is simply to drive on and make your first pen. If you make a hames of it, don’t worry. Keep whatever parts you can from that first attempt and use them as spares later, or buy a few extra brass tubes so you have room to make mistakes while you learn.
Selecting the Wood
I began by selecting pieces that showed some contrast between heartwood and sapwood, as these usually give the finished pen more character.
For my first slimline pens, I cut the blanks parallel with the grain, much as timber would normally be cut. It wasn’t until I had made the first few pens that I realised this often produced only a few grain loops along the body, leaving some of the pens looking fairly ordinary.
For future slimline pen blanks, I plan to cut the timber slightly off the normal grain direction. This should introduce more grain movement and more visible loops along the length of the finished pen. You live and learn.
Spalted timber is a different matter. The spalting itself usually provides enough natural pattern and variation that grain orientation becomes much less important. In most cases, if the piece has good spalting, it already has plenty of visual interest.
If you’re still working out where to find suitable timber, how to process it or how to dry your own blanks, I’ve covered that in more detail in my beginner’s guide to wood for woodturning.
Drilling the Pen Blanks
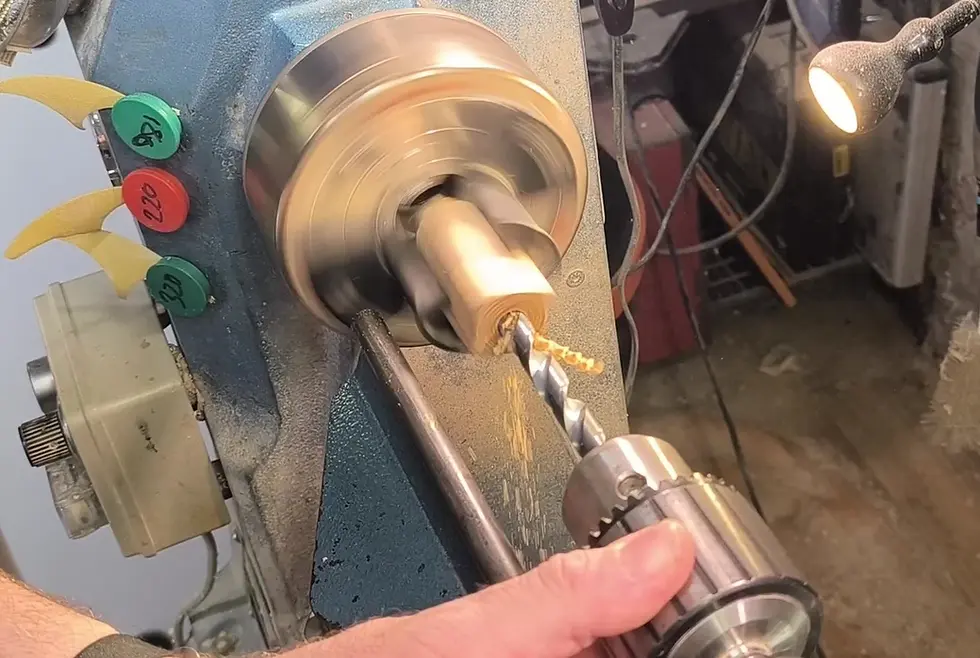
I always thought drilling the pen blanks would be one of the easiest parts of the whole process. It isn’t. Pen drill bits are nearly always longer than they need to be and, depending on the kit, can also be quite thin, which makes them very prone to wandering inside the blank.
I drilled my first pens on a drill press, but I found that the bits wandered more than I expected. I eventually bought a set of pen drilling jaws to suit my lathe chucks and moved the drilling operation to the lathe.
Drilling on the lathe comes with many of the same potential problems, but I find it much easier than contorting myself into odd angles while trying to turn the drill press handles through two revolutions to get through a blank.
I also bought a centering bit to make starting the hole easier. Initially, I used a parting tool to create a small starting point, but I find the centering bit much more convenient. I keep it mounted in a spare chuck so I can quickly swap between it and the drill bit.
Once the starting hole has been made, I bring the drill bit close to the blank and lock the tailstock in position. I normally run the lathe somewhere between 500 and 700 rpm, then slowly advance the drill bit until it makes contact with the centred hole.
If the bit enters true, well and good, I continue drilling. If it appears to wander as soon as it touches the timber, I withdraw it and manually rotate the drill mandrell slightly before trying again, hoping the fresh entry point will find a more favourable grab. I repeat this until I am happy that the drill is entering properly rather than forcing it and hoping it will straighten itself out further inside the blank.
I advance the drill slowly and withdraw it regularly to clear the chips. On an average pen blank, I might do this three or four times especially when it squeals. Allowing the waste to build up around the drill bit can increase heat and may encourage the bit to wander internally. I normally keep an old one-inch paint brush beside the lathe for brushing the waste from the bit between passes.
As the drill approaches the far end of the blank, I slow the feed considerably. If you have allowed a little extra waste timber at each end, you should have some protection against breakout when the drill eventually comes through.
One other lesson came the hard way. Keep hold of the drill chuck or mandrel while withdrawing it and until everything has stopped. One day I let go too early and the drill assembly was flung from the lathe at speed. I was lucky not to be injured, but the drill bit broke in three places. I had no spare, so I also lost several days waiting for a replacement.
That experience made me much more deliberate about the drilling stage. It may look like a simple operation, but getting the hole straight — and doing it safely — makes everything that follows much easier. Mess up this stage and every other stage is harder work.
Preparing and Scratching the Brass Tubes
The outside of the brass tube needs to be keyed so that the adhesive has a good surface to bond to. You can simply place a sheet of coarse sandpaper on a flat surface and rub the tube across it, but I don’t particularly like that method. There are too many opportunities to catch your fingers, skin or nails on the abrasive.
Instead, I gently mount the tube between two cone centres and scratch the surface using Sianet net abrasive. I normally use 100 or 120 grit, although I have seen others recommend 80 grit.
I set the lathe to around 200–300 rpm and move the abrasive from left to right and then back again so that the scratches run in different directions. The aim is simply to roughen and key the brass surface, not sand it smooth. Don’t keep working at it once the surface is well scratched — leave it rough for the adhesive.

Sealing the Tubes Before Gluing
Once the tubes have been scratched, I seal one end before gluing. For this I use dental wax sheets, which I bought on Amazon.
This is a small step, but an important one. It prevents epoxy from being pushed inside the brass tube and hardening there. If that happens, you can create unnecessary problems later when trimming the barrels or assembling the pen. You could add the dental wax to the top as well but I find there is no need.

Removing hardened epoxy from inside the tube can also damage or scrape the brass if you become too aggressive with the barrel trimmer or other tools. In the worst case, that can affect the fit of the pen components, which are designed to press tightly into the brass tube.
The wax simply gives you a little protection against creating a problem that is much easier to prevent than fix.
Pen Making Tools & Supplies: I’ve put together a list of some of the tools and consumables I use for pen making listed in this post on my Amazon UK storefront. These links are affiliate links, which means I may earn a small commission at no extra cost to you.
Why I Moved Away From CA Glue
My first attempts at gluing pen tubes were with different types of CA glue.
The obvious advantage of CA is speed. You can glue a tube into a blank, allow the adhesive to cure and potentially continue making the pen on the same day.
I found the process less reassuring.
While inserting the tube and trying to spread the CA throughout the drilled hole, I occasionally had the tube suddenly stick with perhaps 4mm still left to go before complete insertion.
At that point you have a problem.
Trying to force the tube the rest of the way in before the adhesive has been properly distributed could leave areas inside the blank without a complete bond. That might not become apparent immediately, but it could cause problems later if the wood begins to separate from the tube.
I used quick drying and also medium CA glues with the same results. I would end up with one or two swirls before pushing the tube all the way in. With each of these, I had no confidence that I completely covered the tube surface.
There is another consideration too. Even though CA glue feels fast, I would still be cautious about barrel trimming immediately afterwards. Barrel trimming can generate heat, and I would rather allow the adhesive time to cure properly than risk heating a bond that has not yet reached full strength.
What I really wanted was an adhesive that gave me more working time. That led me to two-part epoxy.
Using Two-Part Epoxy for Pen Tubes
I currently use Gorilla two-part epoxy for convenience and cost.
The main advantage for me is the working time. Instead of racing against an adhesive that can grab the brass tube almost instantly, epoxy gives me time to coat the tube properly and work the adhesive around the inside of the blank.
That is particularly useful if the drill has wandered slightly.
Even when a drilled hole looks good from both ends, there may be a small area inside where the clearance around the tube is greater. Epoxy gives you a much better opportunity to fill those areas and create a complete bond between the brass tube and the surrounding wood.
Setting Up the Epoxy
I tried a few different surfaces for mixing the epoxy.
I initially used the small mixing tub supplied with it, but found it awkward.
I also tried aluminium kitchen foil taped down to the counter top. That moved around too much while mixing and tore.
What works best for me now is ordinary greaseproof kitchen paper secured to the worktop with masking tape. I like the blue type over the white. I originally used an A4-sized sheet, which was far larger than necessary, so I now use roughly half that amount.
It creates a simple disposable mixing surface, stays where I put it and makes cleanup easy afterwards.
I also bought a box of wooden lollipop sticks so I always have clean disposable mixing sticks available.
Mixing the Epoxy
The amount required depends on how many pen bodies you are gluing.
For a small batch, I normally use approximately half to three-quarters of a bead from each part of the two-part epoxy. The size of a 10 cent coin up to a 50 cent coin depending on how many blanks. Aim for there to be some waste from your process, using the right amount for each blank is more important than the 15 cent of epoxy wasted.
I would advise aiming for no more than 6 to 10 blanks at a time so that the epoxy doesn't start to cure before you are finished inserting the tubes.

The important thing is to mix the two components thoroughly. I mix for around 20 seconds and actually count the time out loud rather than guessing.
I also change the direction of mixing several times. You want both parts of the epoxy properly combined so that the chemical reaction can take place throughout the mixture.
Once mixed, I move fairly quickly into gluing the tubes. They are already lined up in front of the sheet before I mix.
Coating and Inserting the Tube
I roll the scratched brass tube through the epoxy so that roughly the lower half of the tube begins picking up an adhesive ring.

I then insert the tube slowly into the drilled pen blank using a twisting motion.
The twisting is important because I am not simply trying to push the tube into the hole. I want the tube to carry and spread the epoxy along the inside of the blank as it goes.
One of the best indicators that you have enough adhesive is seeing a small ring of epoxy forming around the tube as it enters the blank. If you insert slowly enough it will continue to pull the epoxy into the hole uniformly.

I push the tube almost all the way in, but deliberately leave enough exposed to grip it again.
I then pull the tube back out using the same slow twisting motion.
The tube is now carrying epoxy back through the drilled hole and helping coat areas that may have been missed during the first insertion.
I then reinsert it slowly, again twisting as I go, before finally pushing the tube completely into position.
This double insertion takes a little longer, but it gives me much more confidence that the epoxy has been distributed around the tube rather than simply being pushed towards one end of the blank.
Cleaning the Blank
Once the tube is positioned correctly, I remove the excess epoxy from both ends of the blank either by pressing the excess on the sheet or using a tissue. Try not to get epoxy in the top blank hole as it means more trimming.
Because I have already sealed one end with dentistry wax, I do not have to worry nearly as much about epoxy finding its way into the brass tube. The top is an easy clean up.
I then leave the blank lying sideways on the worktop.
Over roughly the next quarter hour, I normally turn the blanks over once or twice more.
The epoxy begins curing fairly quickly, but while it is still able to move, rotating the blank gives gravity an opportunity to help the adhesive settle into any microscopic areas I may have missed.
It may be unnecessary when everything has gone perfectly, but it costs me virtually nothing to do.
Give the Epoxy Time — and Heat
This was one lesson I learned the harder way and is extremely important.
Epoxy requires suitable temperature conditions to cure properly.
I had previously left glued pen blanks in the workshop and then discovered that a brass tube could spin while barrel trimming the following day.
The adhesive had not reached the strength I expected.
I now bring the glued blanks into the house where they can remain at a warmer, more consistent temperature.
I generally leave them there for around 24 hours before barrel trimming.
That obviously makes epoxy considerably slower than CA glue, but it does not actually mean 24 hours of work. I glue the blanks, put them aside and move on to something else.
By the following day, I can continue with much greater confidence in the bond. I often do one or two pens a day alongside other projects so I don't worry about pen production targets.
I prefer this slower epoxy approach as it means I don't have to worry about the wood delaminating from the brass tube as one of my customers uses their pen.
CA Glue or Epoxy?
There are advantages and disadvantages to both. Many pen makers prefer CA and there's nothing wrong with that at all. Each to their own.
CA glue is extremely quick. If everything goes correctly, you could drill, glue, trim and turn a pen on the same day.
The disadvantage is that you have much less working time. If the tube grabs before it is completely inserted, or if the glue has not spread properly throughout the drilled hole, you may end up with incomplete coverage around the brass tube.
That becomes more important if your drilling has wandered slightly.
Two-part epoxy is much slower.
For me, however, that slower curing time is actually part of its advantage. I have enough time to coat the tube, insert it, withdraw it, redistribute the adhesive and then position it properly without racing against the glue.
I would rather leave the blank overnight and work on something else than discover later that the bond between the tube and the wood was incomplete.
At the moment, epoxy is the method I have the most confidence in.
I only started making pens properly this year, so much of this process came from trying different methods and working out what suited me best.
If you’re new to woodturning more generally and still deciding what equipment you actually need, I’ve also put together a guide to beginner woodturning tools — what to buy first and what to avoid. From pen making and spindle turning to bowl turning, there should be some useful advice there for you.
What Comes Next?
Once the epoxy has fully cured, the blanks can be barrel trimmed and prepared for turning. I’d advise taking it slowly with the barrel trimmer rather than trying to remove too much material at once.
And one other word of advice: if you make different types of pens, don’t accidentally mix up your barrel trimmers like I did once. That is a very easy way to damage a brass tube.
I may cover the next stages of the process — including barrel preparation, turning, finishing and pen assembly — separately in another post at some point.
In the meantime, you can also browse my Woodturning Guides & Articles for more beginner-friendly help, techniques and workshop advice.
Thanks for Reading,
David
P.S. If you found this article useful and you're a member of a woodturning forum, club or discussion group, you're very welcome to share it there if it's relevant to a conversation. It may help another turner too. You can share this post using the three dots at the top of the page, or directly from the Blog list page.
──────────── ✿ ────────────
If you’d like to support what I do here, there’s a small “buy me a coffee” option below.
──────────── ✿ ────────────
☕ Buy Me a Coffee?
I used to run ads on my website to generate a small income, but they slowed things down and didn’t fit the feel of what I’m building here. So, I’ve removed them in favor of something simpler and more personal—a “Buy Me a Coffee” button.
If you found this post interesting, helpful, or simply enjoyable, feel free to use the link below to show your support. No pressure at all—but every little bit helps, and it’s always genuinely appreciated. As a small independent maker, I rely on a mix of teaching, crafting, and sharing to keep things going. This is just one way to help keep the shavings flying. Thanks so much!
About the Author
I’m David Condon, a woodturner and small business owner based in Tralee, Co. Kerry. I’ve been working with wood for most of my life at this stage — 11 years as a carpenter and over a decade running my own woodturning business.
Over the years, I’ve learned that woodturning is as much about patience and problem-solving as it is about tools and technique. I work mainly with Irish hardwoods, teach woodturning full-time, and spend most days learning something new in the workshop myself. On this site, I share the same practical knowledge I pass on to my students, shaped by experience, mistakes, and time spent at the lathe. If you’re interested in learning in person, I offer woodturning lessons in Tralee, with details available on my Woodturning Tuition page.
© David Condon Woodcraft – All Rights Reserved.
More Woodturning Pages to Explore
● Hampshire Sheen - Fine Finishing products that will highlight your project pieces
● Hamlet Tools - Fantastic Woodturning Tools from a well trusted brand
● Woodcraft Hub - View my woodcraft creations for inspiration of gift buying.
● Sanding Essentials - Essential sanding products for Woodturners & Woodworkers.
● Woodturning Blanks - A fine range of Hardwood Spindle Blanks & a few Bowl Blanks too!
● Woodturning Pen Blanks - A huge assortment of Acrylic & Irish Hardwood Pen Blanks.
● Crafter's Haven – A vast range of craft supplies for crafters and gift givers!
Original content © David Condon Woodcraft — Written by David Condon. Please credit and link if shared.


Comments